Wednesday, May 16, 2012

Having Your Own Sale Part 4: More Sign Placement

My last post discusses where to place signs in your neighborhood; today I am going to discuss where to place your signs at intersections.

Last week I discussed that our model neighborhood needed signs at twelve intersections. If you have forgotten, those twelve intersections are circled in red below:


No matter how good your signs are, and no matter if you have all the necessary intersections in your neighborhood covered, if your signs are not well-placed at your intersections, people are going to have trouble finding your sale.

Long-distance readability is the most important factor in intersection sign placement and really trumps all the other rules I'm going to list later. You want people to be able to see your sign from one hundred or more yards away (remember your fluorescent paper?) so you need an unobstructed line of sight. Don't place your sign someplace where it may be blocked by trees, other signs, parked cars, etc. If in doubt, walk down the street after you place your sign to make sure you can see it.

One mistake I see frequently is that people place their signs on stakes which they then stick into the ground. It's good in the short run -- it takes only a few seconds to set up -- but it's bad in the long run because people driving by have trouble seeing it. You want your signs to be eye-level, so tape them to light, signal, or sign poles. This rule is a part of long-distance readability and should therefore always be followed.

Traffic and the number of lanes at an intersection determine whether you place the sign at the intersection or before it and which side of the street you place it.

Streets with low traffic volume, low speeds, and only one lane in each direction (typically streets within subdivisions) are the easiest intersections to place signs at. Speeds are low enough (and there's only one lane) so you don't have to worry about people missing your sign or not having time to turn so you can just place your sign at the intersection (ie, on the street or stop sign). If it's a right turn, put the sign on the right side. If it's a left turn, the street is narrow enough for you to put the sign on the left side of the street because it's preferable for you sign placement to suggest the turn direction.

Drivers on heavily-trafficked and wider streets need more of a warning before they can turn. I usually place a sign around one hundred yards before the turn and then another sign at the intersection. If it's a right turn, both signs go on the right side of the street. If it's a left turn, the first sign (the sign away from the intersection) goes on the right side and the second sign goes on the median. If there's no median, the second sign goes on the right as well because it can be difficult to see signs across so many lanes of traffic.

When placing signs at intersections, you want to place them before the turn. This is kind of hard to describe so I'll conclude this post with some images I think will clarify what I mean. The dotted rectangles represent a possible median.


One lane right turn: single arrow at the right side of the intersection

One lane left turn: single arrow in the median (if exists) or the left side of the intersection

Multi-lane right turn: two arrows: one before intersection on right and one on right side of the intersection


Multi-lane left turn: two arrows: one before intersection on right and one in median (if exists) or the right side of the intersection


Saturday, May 12, 2012

5/12/12 Purchase Summary

I bought a lot of stuff today, ten items for a total of $3.10. Sales weren't that good but I got lucky.

The first sale we stopped at had a lot of old electronics -- such as stacks of old hard drives -- and a lot of video game stuff -- most of it broken, such as the cases for several XBox 360s, a PS3 lacking a hard drive, some DS games, and some worthless Super Nintendo Games. None of this interested me until I saw a Super Nintendo controller sticking out of a tangle of wires. 

One of my friends asked me last week to look for a Super Nintendo controller for him. I explained to him that while I would gladly look, my chances of finding one was extremely small; before today I had only ever seen a SNES controller at one sale in my life. 

The sellers were very reasonable -- asking $1.00 per controller which I worked down to $0.50 -- so I also decided to buy two Sega Dreamcast controllers I found while untangling the mass of wires. They're aftermarket but decent; I have an identical one already. Dreamcast controllers are as hard to find as SNES controllers. With the three controllers I threw in a Sega Game Gear TV Tuner (worthless, as it turns out) and a random mask I thought looked interesting, all for $2. As it turns out the mask is part of an industrial respirator and costs anywhere from $130 to $200 new (I'm not sure the materials so I can't tell which model it is).

Later on in the day I bought some more items. I bought Guns, Germs, and Steel for $0.25. I started reading it last night but my Kindle copy is bad. I bought a first aid kit (only for the box) for $0.25, it included Tylenol that expired in October of 1987. I bought a "Beware of Guard Dog" sign for $0.10. My final purchase was two textbooks for $0.50; I have them listed on Amazon for $13 and $40 right now. I seem to have gotten pretty good at guessing which books are valuable. I only wish I had a smart phone so I could have checked the other, older books at that sale.

I'm pretty happy. I got my friend a good gift, some stuff for myself, and when those books sell, I'll profit around $38.

Having Your Own Sale Part 3: Sign Placement


Properly placing your signs is the most important way to prepare for your sale; without clear signs, people won’t show up.  You want your directions to be as unambiguous as possible, the potential buyer should not be required to guess at all.

You should plan out where you are going to place your signs before you head out to put them up.  The goal is to funnel potential buyers from the busiest streets near you house, so you should have signs in both directions for these streets.

For this post, I’m going to be using a simplified version of my old neighborhood as an example.  The widest lines represent multi-lane arterials; these are the roads with high traffic volume from which you want to siphon potential buyers (lettered streets).  The lines of medium thickness represent multi-lane non-arterials; these streets don’t have any houses and are used to enter the subdivisions.  They usually have two lanes in either direction but may narrow to one lane in some instances (numbered streets).  The narrowest lines represent the residential roads.  These roads have only one lane in each direction and are fronted with houses (unnamed streets).

The main streets from which you want to attract your buyers are marked in red below:

In this example, as you can see, the main streets surround my house on three sides.  This isn’t always the case; some neighborhoods only have two directions from which it makes sense for buyers to approach.  Some have four and, occasionally, some have one.
From the arterials, you want to get your buyers going in the direction of your house.  You want to route your buyers along non-residential roads for as long as possible because they have to drive slower on residential roads, making it seem like it’s taking forever to reach your sale.  Depending on where the driver is coming from, you should funnel them along different routes.  For example, if the driver is on A Street, I would have him or her B Street or C Street to 1st Street.  If the driver is on B or C Streets, I would have him or her take 1st Street to the sale.

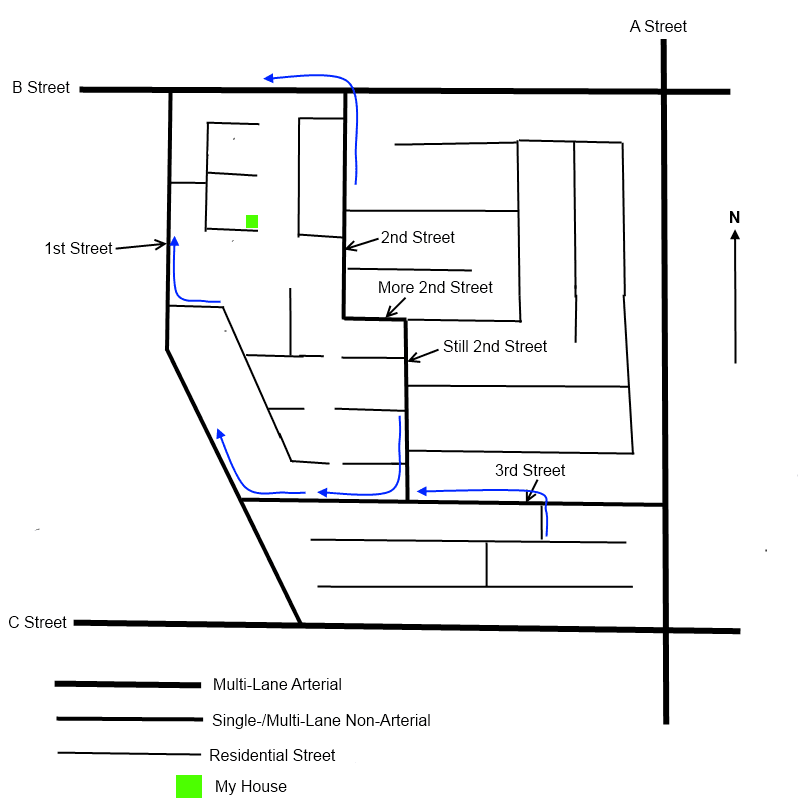
This leads us to the issue of where we actually place the signs. As we discussed above, we want to lead people away from the arterials, so we are going to need signs on the arterials and all the other streets traffic directed to our sale will take to get to the sale. This is probably confusing, so I created the following series of illustrations to demonstrate what I mean:


In this first image, the blue arrows represent traffic flowing in the arterials. We need to figure out what path this traffic needs to take to be redirected to our sale.


This image is more complicated than the last one. In this case, the blue arrows represent traffic redirected from the arterials towards the sale. In the case of B and C Streets, the eastbound and westbound traffic is redirected onto 1st Street. In the case of A Street, southbound traffic is redirected onto B Street and northbound traffic is redirected onto C Street. In cases where lines share arrowheads, traffic is merging (for example, southbound A Street traffic is redirected westbound on B Street and merges with B Street's westbound traffic).


Once traffic is directed onto 1st Street, it becomes an easy matter to direct it to the sale. Be sure to direct both northbound and southbound traffic into the subdivision or many of your potential buyers will miss your sale. Also be sure that the route through the subdivision is clearly marked; you want it as simple as possible. Nothing should be ambiguous, mark every turn. You do not need to mark for people to go straight unless they may be going straight long enough to think that the signs they saw led to nothing (meaning they were from a sale from a previous week). In very few subdivisions will there be a straightaway long enough for this to be necessary.

We have now identified seven intersections at which we need to place signs: the four arterial intersections, the intersection leading into the neighborhood, and the two intersections within the neighborhood. We are not done. While we have delineated a path for people outside the subdivision, we haven't made it clear for people living within the subdivision (the purple areas) that there is a sale:


We just have to direct traffic out of the neighborhood towards the sale.  Only five intersections need to be addressed:


From these five intersections traffic will be directed to 1st Street to the sale.

I was going to continue this post to discuss where to actually post the signs at the intersection but I think that will wait until the next post.  I guess my three week series is going to be at least four weeks.

Monday, May 7, 2012

Having Your Own Sale Part 2: Sign Design

I’m breaking up my discussion of advertising into three days: two days on signs and one day on Craigslist. Today, I will be discussing sign design, or “how to make a sign that won’t make me crash trying to read it.” 

It seems very few garage sale holders put any thought into their sign design. Some of the signs I see are ridiculous: pencil on cardboard, 8.5”x11” sheets, signs listing everything the seller is trying to get rid of, and worse. You can't read these signs, especially when you're driving by quickly.  

People fail to understand that simplicity is key for garage sale signs: you want something that can be seen, from a distance, at a high speed. The best garage sale signs have to words: “YARD” and “SALE” in all caps with a single, bold arrow. Don’t write garage (it has more letters so they must be smaller to fit on the page) and don’t write estate because it has a different connotation (ie, those terrible sales run by companies). Don’t try to be clever and call your sale a “vintage sale” or a “treasure sale;” you’re just being dumb if you do that. 

You want the fewest characters on your sign as possible to maximize character size, hence writing yard instead of garage. Don’t try to write what items you have because people won’t be able to read it (if anything, you scare them off because you don't list what they're looking for) and most people don’t care anyway. Don’t bother writing your address either. Again, no one can read it and most people won’t know the area well enough to find your house based on the address anyway. My rule is that if there’s an address and no arrow, forget the sale. I’ve been garage saling for almost six years now and there are still only a few streets in the subdivisions I know by name. 

Sign color is important as well. You want something that people can see from a long distance; fluorescent paper is perfect for this. If you can’t use fluorescent paper, use white paper. Cardboard is too dark to read most text, especially at a distance. Contrast is key. 

I get my signs printed at Kinko’s or a similar copy place. I create a landscape-oriented Microsoft Word document that only reads “YARD SALE” in a bold, sans-serif font; I increase the font size until each word fits on its own page. I do not include an arrow on this sheet. I then print the signs on fluorescent green cardstock and tape the signs’ backs to manila folders cut to size for additional stiffness (allowing me to reuse the signs – I’ve used the same signs at least seven times now). 
 A mock-up of the signs I use; the black line indicates the top of the “SALE” sheet. Note how part of the “SALE” sheet overlaps part of the “YARD” sheet to prevent excess space between the words. Also note the extra space below "SALE" so I can later add an arrow.

I print the arrows on separate sheets so I can assemble the signs later on; this way I do not make the mistake of having too many signs pointing to the left or too many pointing to the right. I simply make large, bold arrows in Microsoft PowerPoint (several to a sheet) and print them on the same type of paper I use for the signs. Be sure to use arrows with large heads that a person can quickly read. 
A good arrow.  Note how the direction can be read even from a distance.
A bad arrow.  It is difficult to read the direction from a distance.

The arrows can be taped directly to your sign below the word sale. Use packing tape because it is strong and clear.

Saturday, May 5, 2012

5/5/12 Purchase Summary

I spent $1.25 on four items today. The first item was a Nerf gun: the Recon CS-6 for $0.50. According to the Nerf wiki it's pretty popular gun so I'm confident it will sell. I have it listed on Craigslist for $18 but I expect to get closer to $10. My other three items were acquired at one sale. I bought a snowman Christmas decoration for my mom for $0.50; I was going to keep it until her birthday until I realized how big it is. She'll be getting it for Mother's Day. I also bought a Flamingo Floater (sorry I can't post an image but Flickr doesn't let you embed its images and my own photographs are awful). It's an inflatable flamingo with a ring-shaped body into which you place a matching glass so you can enjoy your beverage in the pool. I had one of these from a garage sale free pile that I brought to a Hanukkah party gift exchange; it provided popular so I figured I could repeat it for $0.25. The last item I purchased (well, my friend purchased -- it was $2 per bag of books and she was kind enough to place my book in her bag) was an Agatha Christie collection. My sister only has one of the novels in the collection so I got lucky. It will make a good birthday gift, especially since it looks new.

Thursday, May 3, 2012

Having Your Own Sale Part 1: Introduction

After having my own sale on the 28th, I decided to start a “Having Your Own Sale” series. It’s a little outside the scope of this blog – despite its title – but I am sick of going to terrible sales every weekend. My goal is to improve the overall quality of garage sales, at least a little bit. 

I currently intend for this series to last three weeks. It may take longer if I think of more things to discuss, but it should be done just in time for prime garage saling season for those of you in worse parts of the country (garage saling season has already started for those of us in Southern California). I will be discussing preparation, advertising, and hosting the actual sale. Today I will be discussing preparation anywhere from months to one week before the sale. 

Garage sales don’t need to be stressful. The key to a successful garage sale is to plan ahead. 

I usually start planning for sales two to three months in advance. At this point, I just start getting items ready. I keep two lists: the Goodwill list and the Craigslist list. The Goodwill list consists of everything I am getting rid of regardless if it sells or not. If I still have it by the end of the sale it’s going directly to Goodwill; if someone offers me next to nothing for it I’ll take it. 

The Craigslist list consists of more valuable items I don’t intend to just give away. If someone makes me a good offer, I will accept it. If the item doesn’t sell I will keep it for myself or to sell on Craigslist. When I’m in the planning stage, my Goodwill list is a physical pile of items in the garage. My Craigslist list is an actual list on my computer that consists of my current Craigslist items and personal items I wouldn’t mind parting with for the right price. 

One of the keys to garage sale success that many people miss is quantity. Buyers can only buy things if they get out of their cars and many buyers do drive bys if sales look inadequate. How do you get more people out of their cars? Have more stuff. Obviously, there’s a limit to the amount of your own stuff you can sell, so get your neighbors and friends involved as well. The more stuff you have packed on your driveway the better. One large sale is better than two small sales; have your neighbors sell stuff at your house or vice-versa. It may be irritating to move your stuff to someone else's house but it’s worth it. 

Coordinate with your neighbors/friends ahead of time to choose a date good for all of you. Avoid any weekends with holidays or any major local events that may cause fewer buyers to come by. 

The weekend before the sale is the time for more serious preparations to begin. Double-check with your fellow sellers that the date still works. Start getting the items from your lists together and make sure any electronics are still working. 

Finally, this is the time to do any last-minute research regarding items and their values. If you are unsure what something is, look it up because it’s always good to appear knowledgeable. Make sure the item isn’t something of unexpected value and get an idea regarding how much you intend to ask for each item.

Monday, April 30, 2012

2011 Profit Update

For those of you who have been reading this blog for a while, you probably remember that in end of December I published a post that summarized my purchases and net income/loss for the year after including a calculation for money spent on gas.  I concluded that I had pretty much broken even by the end of the year.

Since December, I have sold a few more things I purchased in 2011.  Even though I sold them in 2012, I'm not counting these in my 2012 profit because I bought them in 2011, just as I didn't include items purchased in 2010 in my 2011 profit calculations.

Anyway, I have another $195 to add to my 2011 calculations, which means 2011 was a profitable year (by ~$196) for garage sales after gas payments.  I sold a pocketknife for $5 (it was included in a Gameboy bundle I purchased to resell), the laser tag set for $110, some bootleg DVDs at my garage sale for $10, a mechanical keyboard for $40, and a Playstation 2 for $30.  I still haven't sold that damn TI-92 graphing calculator. I'm especially proud of the DVDs; I bought fifty of them for $0.50 in November and sold them $2 each on Saturday. I still have forty-five left so I'm just going to keep them until the next time I have a sale.

Not included in the $185 were items I purchased before March 2011 and resold in 2012 (mainly games I no longer play). These items represented an additional $69 after shipping and fees.

Saturday, April 28, 2012

Garage Sale Success!

As I mentioned last week, I hosted my own garage sale today. I ended up making $109.50, just short of my goal of $100. I also sold $16.50 of items for my sister and my friend with whom I had the sale made $175. Breaking $300 combined income from a garage sale is pretty respectable, especially considering that we didn't have a massive quantity of items.

The best part about today's sales was getting rid of some older Craigslist items. I finally got rid of that damn silverware -- I only got $10 for it but that's still $5 more than I paid for it. I also sold that graphics card I bought last week for $22, or a profit of $19.50. The guy who bought it was clearly a reseller; I wish him the best of luck. If I had sold it on Amazon I would have profited approximately $24 after buying it for $2.50. He'll be lucky to break even selling it on Amazon, eBay, or even Craigslist. 

The guy who bought the graphics card was actually one of several resellers with whom I interacted today. I feel sorry for them when they get home and realize their investments were terrible. These guys were amateurs, paying $15+ each.

I also got rid of some stuff I had bought in previous years (meaning stuff I no longer need or use) -- $31 in total. To my surprise, I did not sell any of the signs I purchased last week; I intend to keep them and sell them at a future sale. 

Selling that silverware raised my profit from garage saling on January 14th to $96.60; if I ever sell the mechanical keyboard or the AlphaSmart I bought that day then January 14th should reclaim the title as most profitable day ever from December 10th (the day I purchased the Laser Tag system).

Thursday, April 26, 2012

Items to Look for: Printer Cartridges

One item I've been seeing more frequently at garage sales is printer cartridges. As I'm sure you know, printer ink is absurdly expensive, so why not buy that $0.25 factory sealed instead of spending $40 on it at the store? Just be sure to note what cartridges your printer uses so you don't end up with a bunch of ink that won't work with your printer.

For whatever reason, HP ink is definitely the most common at sales. This leads me to believe that HP printers are most commonly used or the most likely to fail unexpectedly. I do also see Brother and Canon ink on occasion.